Tuesday, October 29, 2013

Floaking, Reaper LE Sci-fi Sophie diorama base

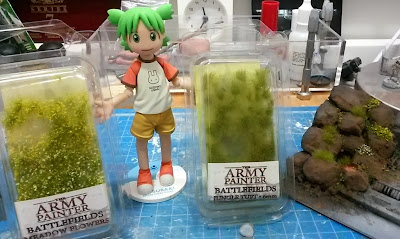
Hi everyone. It seems that Yotsubato is bringing in a lot of traffic to my blog, so here's she again. Say hi Yotsubato.


I think all the modeling of the base is very much done, so it's time to put some finishing touches to it.  To make the rocks look natural, it's time for flocking.  I noticed in real life that grass grows better from bigger gaps or cracks between the rocks.  When unattended, smaller plants instead of grasses will grow too.  To recreate that I put white glue between the cracks and then sprinkle these fabrics down there.


Next I used these ready-for-use small stubs of flowers and tall grass on the flatter area of the rocks.  I imagine that before the land slide they would have been growing grass, so I would imagine the grass will keep on growing.

Here are some close up shots of the grass and the flowers, beautiful isn't it.


As good as these grasses are, I still have to trim them so that they look less like they are just bursting out of flat ground in a fan shape.


Later on I'd post some better shots of the set up, and there's Yotsubato, complaining that there are still no miniature on the base after about 10 entries....

"Where are the miniatures??"

Friday, October 25, 2013

Reaper LE Sci-fi Sophie diorama - the 4th character

 If you recall, there was only one drone on the ground, looking at the ferret.  But his body language is saying that he is disctracted by the ferret, so that means he was suppose to be looking at something before the ferret pops up from his lair... hence I give made that 'something.
By the way, the drones are actually Nasmat remotes from Infinity Miniatures


The story goes: the fallen drone landed on the rock slide at the site, but he slipped! He fallen to the the hard ground of the launch pad, the raised part of the base broke his right hip joint and its right arm.  The ferret came out, saw the broken arm laying around, he went over to pulled it off and carried it to its lair.
The drone send off distress signal and the other drone landed, observing its fallen friend.  Suddenly the arm fall off from the ferret's grip and attracted the attention of the drone, all the while Sohpie came descending down from above....


I had to cut off its right leg at the joint or else he doesn't look like he is in distress.  I then put a pin (short portion of a paper clip) to connect the leg to the body.  As I imagine there should be wires running between the limbs and the body, I glued some very thin wires to the arm and the joint, hopefully they would look convincing enough.


oh by the way, my little assistant took a break so she didn't make an appearance this time.

Weathering with base paint and salting

Not much of an entry but rather this is a record of what I did with the structure to the SF Sohpie diorama.  I took some better picture of the structure.  This is what it looks like now, next step will be some very careful air brushing to emphasize the lighting effect.


This is what I started with.  By the time I finished it had got a few thick coat of paint and glue already.  Because it's just the base so it doesn't really matter though.  The rust is painted with a mix of Secret weapon wash with a lot of pigments.  Although most of this gone to waste because I haven't put enough salt on it before I apply the air brush.

The result is actually quite impressive.  This is the first time I use this technique and it turns out just fine.  I can always do some more careful weathering of course, but kind of regret that I haven't sprinkle on enough salt on it.  Also I should have done this before I did the rock slide so that I could try submerging it into warm water to remove the salt, instead I scrapped it off with a brush and carving knife.


Thursday, October 24, 2013

Forum entry - Reaper BONES and their release of metal miniatures

[[To keep this blog lively while I am on trip or getting slow on the paint jobs, I will re-post my posts in various forums, so that also pushes me to post more on the forums]]


The original entry
link: http://www.reapermini.com/forum/index.php?/topic/50922-done-with-big-metal-miniatures/page-4

Hi guys

at the risk of being hated by the admin, I'd still say it...

I started painting miniatures 4 years ago, only painting as a hobby rather than gaming, so I quickly moved away from Games Workshop and moved to Reaper, Wyrd, Freebooter etc.  At first I was very excited to find Reaper, with the wide range and very beautifully sculpted miniatures (especially the girls) and I remember emailing Reaper to asked if I got the price right, cause it's such good value.

So then on, I go to the website very now and then.  I remember Reaper push out 5 - 10 new minis every month, those were happy times.  Until after the first BONE campaign started, then it all dies down a lot. These days, there are hardly as many updates as there were a few years back.

So I finally got my hands on the first BONE miniatures, and I am sorry to say this: most of them are not too well done.  I mostly paint girls so the face matters a lot.  I got some the pewter version of some of them so I can do a direct comparison, not only the pose of the mini changed, their face changed too.  I can give examples photos but I really rather not.  I wish this is only isolated incidences that I happen to get a less than well done batch.  It goes without saying that I would only buy the pewter minis.  If one day Reaper choose to produce only BONES, then... I hope not.

I understand you got what you paid for and metals are becoming more expensive and all, so I am not complaining about the quality of the BONES, I am just writing to say that I wish Reaper could focus less on them and give pewter a few more resources. 
Responses that I had responded to

Carnacki the Ghost Finder, on 15 Oct 2013 - 02:13 AM, said:
I have just finished painting a HUGE metal beast and many times I thought: man I wish this weren't so heavy. 

And when I paint a little Bones person I think: it mostly looks the same, but where's the heft?

That made a lot of sense actually, I didn't get to see the bigger BONES 'miniatures' coz I don;t think I am good enough to make them look big.  Chances are, if I paint a giant griffin with a rider, people would just think I painted a normal size bird with a tiny rider...

anyway the BONE dragons look awesome, and yea that's not possible with metal.  But then look all all the plastic model kit GW is pushing out, those are almost like action figures rather than 'miniatures'. Would BONES be heading towards that path? I don't know and I hope not.

Sunday, October 20, 2013

Thank you

Big thanks to Trystan for letting me having his Sophie and a very happy surprise, the Bishop (Wyrd).
They are in my good hands buddy :)

To see the awesome paint job of Trystan, please visit:
http://www.coolminiornot.com/artist/TrystanGST

ps, the backing sheet is drawing of my 6 years old.


Saturday, October 19, 2013

Reaper LE Sci-fi Sophie diorama base WIP 4

Yep we are still working on the base because when I finish painting Sophie I will lost interest and the base will look horrible.  And yes, Yosubato is making another appearance, although she seems busy with the ferret.

The idea is that I need to fit the miniature in place BEFORE it got painted.  One hard lesson that I learn from doing dioramas.  It comes with a small base so that its foot and tail have somewhere to sit on.  I did my best in cutting and chipping away the metal base and made it as small as possible.  Then I chipped a hole on the 'rock' and try to fit it in, and used green stuff to fill in the gap around it.  Because the rock is actually clay it doesn't really stick to the green stuff too much.  I managed to wiggle it off the rock pretty easily.

(It just occur to me that I need to pin it to the base when it is done else it will fall out of place.)


I got a small lump of green stuff left after I fixed up the base for the ferret, so I used them to smooth over the cutting marks on the structures.


As it turns out it looks quite nice and smooth.  Good thing about green stuff is that it won't shrink a lot, unlike putty.  Because it felt a bit like hard rubber I can actually scrape on it to create a smoother surface.


I always thought of replacing her wings with another more futuristic wings like the one in the picture.  But as it turns out it isn't such a good idea because the wings (taken from SD Gundum) is too "cartoonish". Plus, the diorama has a lot of  nature elements to it so I guess her original wings would fit better.  It costed me US$5 to buy the SD Gundum and it's pretty costly just for that pair of wings.  Oh well.


Originally I thought of adding a pin to the tip of the wing but it seems pretty hard and she would get too high off ground.  Instead I placed two pins to the back of the tip.  It took a bit of very careful drilling and I almost drilled through to the other side with the upper one.  It created a small bubble on the front and I had to send it away.  I am very surprised the brass rod could actually hold her up, but I guess at the end I would have to glue the wing to the structure.


I am pleased at the result, the whole point is to make her look like she is flying.  But personally I would always look for the connection point, the part where the model is connected and suspended.  Because it is connected in a less conventional way it would be less obvious to the viewer, so I hoped.


So to make the structure looks more damaged and blended in with the whole setting, I will do a lot of weathering to it.  I had never did salting before so probably I had wasted a bit of pigments here.  What I did is I used Secret Weapon wash as the suspension medium and added a lot of pigments to the mix.  It looks very good actually but I haven't let got a good shot at it yet.  The thing is, because I will be doing salting, a lot of the pigment will be lost in the process.  So I could have simply just painted it brown instead of using pigments... but I guess I want to see how it looks like if I use medium and pigments.  Oh well.


Until next entry, thanks for reading.


Friday, October 18, 2013

Reaper KS Urban Legend Sophie - Done - (NSFW)

Well, I did my best but seems there still a lot could be done.  The worse part is that I was away for two weeks and left her out cold for so long, so I had left out some important steps and got some sequence wrong. But I guess this is really already my latest best, using almost all of the equipment and techniques I learned through out the years.  All in all, I'd give myself a B+


So I guess I better post some 'money shots' up front, here are photos of her chest.  Personally I would prefer the version with armor but this one works too. This is the first time for me to paint a nude mini, and so this is the first time I painted nipples.  Having seen a lot of these (I am a guy, okay?) I think I did a pretty good job.


Well this is a personal blog so I'd be honest with the photos.  I had decided to paint her eyes closed because the sculpt was cast this way, I tried painted it was an opened eye and it looks very odd.  The other eye is VERY hard to paint because of the hair.  So if you look closer, it doesn't turn out well.
And as far as honesty goes, I haven't done a good job with the hair too.  I guess I should have air brushed the hair, and give her body a flesh tone base coat as well...


Again, being a guy and having seen a lot of the back side, I think I did pretty good.  Although I haven't sand the surface a lot it's still reasonably smooth.


The wings looks fine, I believe.  This is the first pair of wings I painted because usually I just forget about the wing and fill the hole on the back.  Since this mini isn't mine so I have to keep it on.  As it turns out, the wings really did give her a lot of character.


First time ever painting of a motor bike, I guess I can make it a lot more 'shinny'.  I like how the wings turns out though.


I guess with basing it's all the little details that matters.  I placed an hand axe on the ground so that there's a reason for her to look down and to the left.  There's actually some skid mark on the ground but I haven't done a good job with that.  The flocks are actually ready made so that look so real, but I think I did pretty well with the ground as well. 


Wednesday, October 16, 2013

Making boulders with paper clay 2/2 - Reaper Sci-fi Sophie diorama WIP

So before I put Sophie there I think Yotsubato would be the main attraction these entries.

"Hi everyone!"
So here it is, I put a big piece of cardboard as background so that my paint rack won't confuse everyone.


To add more texture to the rocks I used a carving knife to chip away the smoother and rounder surfaces of the balls of clays, so it looks less like rabbit poo ;).  The 'mud' dried out very nicely, I guess by accident I found a way to more evenly and randomly apply sand to an area.


I first air brushed the recess and gaps and holes and cracks between the balls of clay with dark blue.  I did the same for the edge so that it looks more like an edge and it helps with directing focus to the middle of the setting.  I haven't done a great job with the mix for the highlights but as it turns out, the mix was just right for the structure.


The mixture was a white + light blue + brown.  I air brushed the whole structure trying to show the different layers of the base and giving it more dramatic lighting.  I guess I might need to do more air brushing with the structure, but I guess I'd do some weathering first.  Also I need to do quite a bit of base coating to cover up places where it used to stick to the plastic frame.


[[[ for closer to finish looks of the boulders, please visit: http://51-cent.blogspot.hk/search/label/sci-fi%20sophie  ]]]


Here's a shot of the back of the structure.  Next up, the ferret.


Related Posts Plugin for WordPress, Blogger...